

Hey all!
It's about time I get to writing another post... perhaps we have been busy with what is known as "fall crazy" and the holidays and everything, and we have been working on some major projects like this kitchen redo, or perhaps I just haven't gotten around to posting, or felt like anything I was working on was "post-worthy" but at any rate, here I am! And I am so excited to show you our most recent project!
A little background: When we moved into our little 1960's house almost 2 years ago, everything was plain, builder grade, blah, and many of the fix-up jobs the bank had done were pretty lame (trim with uncovered nail holes, cheap carpet that only lasted a couple of months, flat paint, etc. But I really can't complain). It was nice. Move-in ready. Definitely live-able. For that, I am thankful. There was so much potential for what we could do to improve it with little changes here and there and not spend a ton of money completely redoing everything. One of those changeable things was the kitchen. The kitchen was one of our favorite features about the house, because it is pretty spacious, (and I know that the size of a space is not easily changed, especially on a budget) and everything was new (cabinets, appliances, flooring, paint, countertops, etc.), though most of those things were on the cheaper end of their respective markets. We did get our own fridge and replaced the oven/stove because we wanted gas rather than electric. Anyway, we were thankful that everything was nice, but we saw potential to make everything great without spending a ton of money replacing everything.
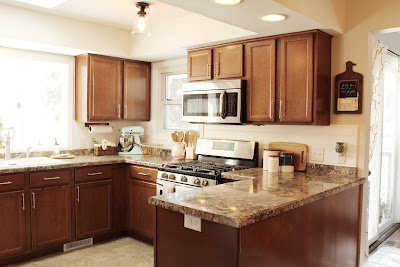
So, here are some "before" pictures of our kitchen. (I apologize for the mess... I hadn't just finished cleaning the kitchen when I took these pics, I just took them so I could count how much hardware to order when I was away from the house, as I was rushing off to work. I know, you're thinking "you would have a nicer kitchen if you cleaned it" and I agree... but hey, lets be honest, these pictures are real life on some many days.).


Before we moved in and before I had any idea how I would decorate our house, or what kinds of things we would get for wedding gifts, or even started moving our furniture into our house, I picked this orange color and we painted two of the walls in our kitchen as accent walls. It worked for a while, and matched my decor (probably because I just like the color orange), but after a while I felt we needed an update. Thankfully, my gracious husband agreed to repaint them, even though he had worked hard to paint them the first time less than two years ago. I love him so. More to come on the paint update later in this post.

(We also tore up our carpet and re-finished the floors in the main living area (and by we, I mean we hired someone to refinish them). And I painted this buffet! Updated pictures of that to come...)

(From our first Christmas in our house! Aww...)
At one point, within the first year of living here, we replaced the basic builder-grade flush mounts in the kitchen with the chandelier (on clearance from Menards, I don't think they carry it anymore) in the picture above, and with these semi-flush mount fixtures (from Lowes) in the picture below. Baby steps, my friends.

(Fun fact: I once saw these fixtures on an episode of Fixer Upper, after we installed them, and it made me feel really good that I would pick the same light fixtures as Joanna Gaines. It's the little things.)
Then, right before Christmas and New Years this year, we decided to take on the majority of the updating work we had planned for our kitchen. We had bought a ton of cedar planking when we ran into a killer deal, while we were working on our screen porch in July, and decided we would use some of it for a backsplash. I love the white planking look, and decided it would be an acceptable (and way easier... and cheaper and tasteful) way to do a backsplash.


Like we did in our previous cedar planking project, we cut the planks to fit the space (this time, no seams where they were visible) and cut out the outlets and what-not with a utility knife and a small coping saw. We found the studs and used a nail gun to secure the planks to the wall. We attached white primed moulding on all of the exposed edges. After that, we used a compound to fill the nail holes and any knots in the wood, and sanded the planks to try to get as smooth a finish as possible.
Then, we used a roller to apply two coats of primer (this is my absolute favorite primer) and two coats of high gloss white paint. We used high gloss paint, because it is easier to clean and holds up to moisture better. Also, it makes it look more "tile-like." We made sure to caulk all of the seams between the counters and the planking, the planking and the moulding, and the moulding and the wall. Overall, we probably spent about $10-$15 for this backsplash, considering the planking, moulding, paint (if you only count the fraction of the paint used for the project, and not the whole gallon), caulk, and nails used to finish it. Not too shabby...


Then, we used a roller to apply two coats of primer (this is my absolute favorite primer) and two coats of high gloss white paint. We used high gloss paint, because it is easier to clean and holds up to moisture better. Also, it makes it look more "tile-like." We made sure to caulk all of the seams between the counters and the planking, the planking and the moulding, and the moulding and the wall. Overall, we probably spent about $10-$15 for this backsplash, considering the planking, moulding, paint (if you only count the fraction of the paint used for the project, and not the whole gallon), caulk, and nails used to finish it. Not too shabby...


We also sanded, primed, and painted the little bay window in front of the sink (which took two coats of primer and paint), and the window frame next to the microwave and stove, and put new trim surrounding each. We filled the nail holes, caulked, and painted the primed trim too. If you happened to notice, we also got a white enamel cast iron sink on Craigslist for $75 and my husband and a friend installed that (I am thankful for a handy husband and friends!), along with a new faucet (which I love! I have learned it is worth the money to spend a little more on a good faucet rather than save a little money and buy the cheapest faucet possible. They work and look so much better! We came from the cheapest faucet possible, and we will never go back.).
Then, it was time to paint the walls! I chose a gray color that was two shades lighter than the same gray we painted in the majority of our house (to make sure it would match). It is my new favorite gray color. It is almost as close to white as you can get, while still being gray. So, it gives really nice contrast next to our white backsplash, but lightens the whole kitchen like nobody's business. The name of the color is Tundra Frost by Pittsburgh (but we got Behr paint and matched the color). We covered all of the flat tan with that beautiful gray, and never looked back.
 This picture is a little deceiving, because the light bulbs we have in our ceiling fixtures give off a yellow hew, but the wall space you can see here is, in fact, gray.
Then, we picked out the navy color for the orange walls. We ended up going with Starless Night from Behr. And we love it. I am convinced that it even makes our ceilings look higher. I don't know what it is, but it seems to have that effect. Also, it just makes the whole space seem more congruent, neat, and polished. We ended up having to do about 4 coats, only because our rollers were leaving large textured lines on the walls for some reason (you can kind of see what I mean in the picture below, however the paint was also still wet). Otherwise, it would have covered well in about 2 coats.

And, last but not least, we ordered this hardware in two different sizes (4" pulls for the smaller doors and drawers, and 5" pulls for the larger/regular sized doors and drawers). As I researched, it looked as though there wasn't much rhyme or reason to what size pulls to put on which cabinets. Some people I saw would do all the same size on all of their cabinets, some would do smaller on some and larger on others, and others would do different hardware on their drawers than their doors and they varied with the size of their doors/drawers. I knew for sure I wanted to do the same style pulls on each door/drawer, so we just ended up varying the size of the pulls based on the size of the doors. And we are happy with how it turned out!

Just the hardware in and of itself added so much to the look of our kitchen! And I no longer break my nails every time I try to open our no-slam drawers, which is a beautiful thing. We ended up spending about $158 dollars buying the hardware we needed for all of our cabinets (we have a ton of cabinets in our kitchen, a wonderful thing in terms of storage), but every penny was completely worth it! Each handle was about $3 apiece, which really isn't bad for new, updated hardware.
Once we were finished, I cleaned up all of the gear we had on our counters for the 2-3 weeks we worked on this project and redecorated (it was Christmas time, so enjoy all of the Christmas decor in the pictures below). We have really been enjoying all of these affordable, somewhat easy updates to our builder-grade kitchen.
And now, my favorite part: the "after" pictures!


And one last before and after pic:


Then, it was time to paint the walls! I chose a gray color that was two shades lighter than the same gray we painted in the majority of our house (to make sure it would match). It is my new favorite gray color. It is almost as close to white as you can get, while still being gray. So, it gives really nice contrast next to our white backsplash, but lightens the whole kitchen like nobody's business. The name of the color is Tundra Frost by Pittsburgh (but we got Behr paint and matched the color). We covered all of the flat tan with that beautiful gray, and never looked back.

Then, we picked out the navy color for the orange walls. We ended up going with Starless Night from Behr. And we love it. I am convinced that it even makes our ceilings look higher. I don't know what it is, but it seems to have that effect. Also, it just makes the whole space seem more congruent, neat, and polished. We ended up having to do about 4 coats, only because our rollers were leaving large textured lines on the walls for some reason (you can kind of see what I mean in the picture below, however the paint was also still wet). Otherwise, it would have covered well in about 2 coats.

And, last but not least, we ordered this hardware in two different sizes (4" pulls for the smaller doors and drawers, and 5" pulls for the larger/regular sized doors and drawers). As I researched, it looked as though there wasn't much rhyme or reason to what size pulls to put on which cabinets. Some people I saw would do all the same size on all of their cabinets, some would do smaller on some and larger on others, and others would do different hardware on their drawers than their doors and they varied with the size of their doors/drawers. I knew for sure I wanted to do the same style pulls on each door/drawer, so we just ended up varying the size of the pulls based on the size of the doors. And we are happy with how it turned out!
 |
| We used this little cabinet hardware template (similar found here) to help figure out where to drill the holes. Josh would mark the cabinets based on the size of the hardware, drill the holes, and screw in the hardware from the back side. We had to go buy some longer screws for our drawers, because they had an extra layer for the face of the drawer. |

Just the hardware in and of itself added so much to the look of our kitchen! And I no longer break my nails every time I try to open our no-slam drawers, which is a beautiful thing. We ended up spending about $158 dollars buying the hardware we needed for all of our cabinets (we have a ton of cabinets in our kitchen, a wonderful thing in terms of storage), but every penny was completely worth it! Each handle was about $3 apiece, which really isn't bad for new, updated hardware.
Once we were finished, I cleaned up all of the gear we had on our counters for the 2-3 weeks we worked on this project and redecorated (it was Christmas time, so enjoy all of the Christmas decor in the pictures below). We have really been enjoying all of these affordable, somewhat easy updates to our builder-grade kitchen.
And now, my favorite part: the "after" pictures!

 |
| My buffet, that I chalk painted with this color and technique. |


 |
| I needed mo' fruit! |


 |
| Now you see her... |
 |
| ...now you don't. |


And one last before and after pic:


(And, now I am tempted to paint the cabinets... but once you paint them, you can't really go back. And I'm not ready to take on such a huge project at the moment... so walnut cabinets, it is!)
There ya have it. Nothing too crazy, but definitely an improvement! And we love it. I hope somehow this may inspire you to make your home into a haven you love!
xo,
Lauren